
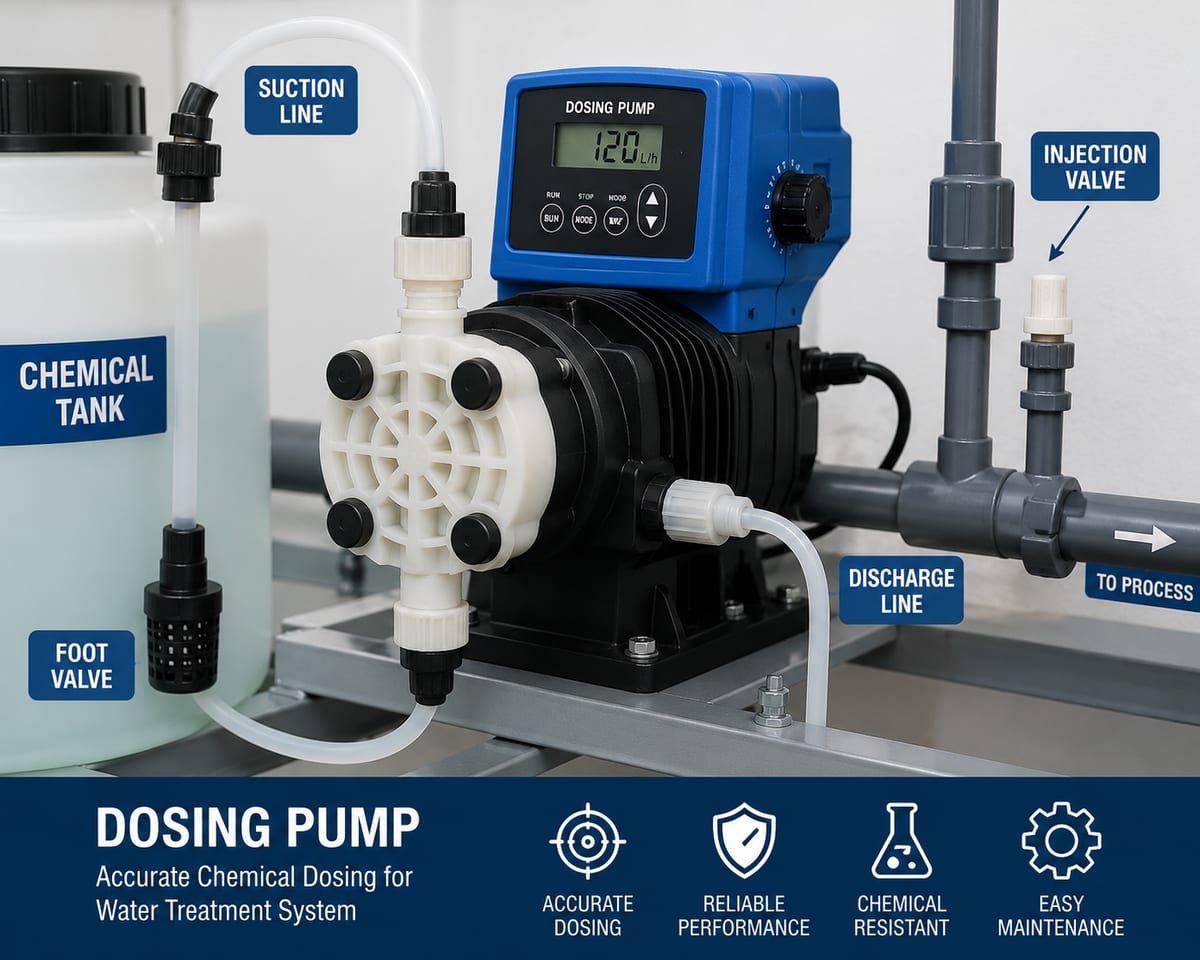
Dosing Pump Troubleshooting: Causes and Solutions
If a dosing pump runs but does not deliver chemical, check the tank level, suction-side air leaks, prime, check valves, discharge pressure, and injection point—in that order. Stop and isolate the pump for a leak or abnormal pressure. Record its settings and measure actual flow before replacing components.
Updated 4 August 2026: drawdown calibration records, operating-release limits, and dosing-accessory handoff were added.
PT Watermart Perkasa, operating through water.co.id, supplies LMI/Milton Roy dosing pumps, OBL, Hydropro, and injection accessories in Indonesia. This guide helps operators separate hydraulic, mechanical, and process faults; the model manual, chemical SDS, and site safety procedure remain controlling.
What should be checked first when a dosing pump has no flow?
Start with checks that do not require disassembly. This sequence separates loss of supply, air ingress, a check valve that will not seat, and a discharge restriction before spare parts are replaced.
| Initial symptom | First check | Evidence to record |
|---|---|---|
| No flow | Tank level, foot valve, suction leak, and prime | Level, bubbles, valve position, priming time |
| Pulsating or falling flow | Check valves, gas in the head, viscosity, and back pressure | Actual flow, stroke/speed setting, pressure |
| Pump runs but chemical does not enter the process | Injection valve, blockage, and line pressure | Discharge pressure and injection-point condition |
| Chemical leak | Head, diaphragm, tubing, fitting, and O-ring | Leak location, material, chemical, operating hours |
| Dose misses its target | Solution concentration, control signal, and drawdown calibration | Volume, time, setting, pressure, concentration |
The troubleshooting section of Milton Roy’s official manual puts tank level, priming, check valves, the suction path, and discharge blockage among the first no-flow checks.1 For additional background, read chemical-feeding components and systems and tips for choosing a dosing pump.
What Is a Dosing Pump?
A dosing pump is a positive-displacement metering pump designed to deliver a specific amount of chemical at a controlled rate. Typical chemicals include chlorine, antiscalant, coagulant, flocculant, acid, caustic, biocide, oxygen scavenger, and pH-adjustment chemicals.
In reverse-osmosis systems, dosing pumps commonly inject antiscalant to reduce membrane scaling. In wastewater treatment, they may feed coagulants, flocculants, nutrients, or pH-correction chemicals. The pump must therefore operate reliably, accurately, and within its designed flow and pressure range.
Common Dosing Pump Problems
Typical field symptoms include:
- The pump runs, but no chemical is discharged.
- The pump cannot draw chemical from the tank.
- Dosing flow is unstable or does not match the setting.
- Discharge pressure is too low or too high.
- The pump head, fitting, or tubing leaks.
- The pump produces abnormal noise or vibration.
- Chemical leaves the pump but does not enter the process line.
- The pump repeatedly loses prime.
- Diaphragms, valves, or seals fail prematurely.
- The pump does not start or respond to its control signal.
Each symptom may have more than one cause. Troubleshooting should proceed from the chemical tank and suction side through the pump head, discharge line, and injection point.
Dosing Pump Does Not Draw Chemical
This common problem may be caused by the suction line, foot valve, check valve, trapped air, excessive suction lift, or chemical viscosity.
1. Check the Chemical Level
Make sure the suction pipe and foot valve remain fully submerged. A low or empty tank allows the pump to draw air. Never run the pump dry unless the manufacturer explicitly permits it.
2. Inspect the Foot Valve
The foot valve keeps chemical in the suction line and prevents it from draining back into the tank. Sediment, crystallized chemical, or a stuck valve can prevent suction. Clean it routinely, especially when handling chemicals that settle or crystallize.
3. Inspect the Suction Tubing
Cracked, loose, kinked, or poorly fitted suction tubing can admit air without showing an obvious chemical leak. Check every connection, keep the suction run short, and eliminate sharp bends or pinched sections.
4. Prime the Pump
Air in the pump head or suction tubing prevents consistent displacement. Open the priming valve, if fitted, and run the pump until chemical flows without bubbles. Priming may be required after changing chemical, draining the tank, replacing tubing, or servicing a valve.
Dosing Pump Flow Is Unstable
Unstable output can cause overdosing or underdosing and affect pH, chlorine residual, treatment performance, and final water quality.
1. Remove Air from the Pump Head
Bleed or prime the pump until the chemical stream is free of bubbles. For chemicals that release gas, consider a degassing head or another configuration recommended by the manufacturer.
2. Inspect the Check Valves
Suction and discharge check valves must seal in one direction. Dirt, crystals, wear, incorrect valve orientation, or damaged valve balls and seats cause inaccurate flow. Isolate and depressurize the system before cleaning or replacing them.
3. Check Stroke and Speed Settings
Output may be adjusted by stroke length, stroke frequency, motor speed, or a digital control signal. Compare the setting with the required dose and verify actual flow through calibration. Avoid extreme adjustments without calculating the required chemical feed rate.
4. Verify Back Pressure
Insufficient back pressure may reduce metering accuracy or promote siphoning. Excessive pressure prevents injection and overloads the pump. Install a back-pressure or anti-siphon valve when required, and confirm that the pump pressure rating exceeds actual process pressure.
Dosing Pump Is Leaking
Chemical leakage requires immediate attention, especially when the fluid is corrosive, toxic, acidic, or caustic. Frequent leak points include the pump head, diaphragm, fittings, tubing, injection valve, seals, and O-rings.
1. Stop and Isolate the Pump
Disconnect power, isolate the chemical source, and safely relieve line pressure. Wear the PPE specified by the chemical safety data sheet, which may include chemical-resistant gloves, goggles, and a face shield.
2. Check Fittings and Connections
Loose fittings, incorrectly seated tubing, or damaged O-rings are common causes. Tighten connections carefully; excessive force can crack plastic components or damage threads.
3. Inspect the Diaphragm
A worn, hardened, or ruptured diaphragm can leak and produce inaccurate flow. Replace it at the recommended interval or immediately when deterioration is found.
4. Confirm Material Compatibility
Pump-head, valve, seal, and tubing materials must be compatible with the chemical concentration and temperature. Applications may require PVDF, PTFE, EPDM, FKM/Viton, or another resistant material. Repeated seal failures often indicate a compatibility problem rather than a defective replacement part.
Chemical Does Not Enter the Process Line
If chemical leaves the pump but fails to enter the process, the injection valve may be blocked, process pressure may exceed pump pressure, or crystals may have formed at the injection point.
1. Inspect the Injection Valve
Safely remove and clean the injection valve. Establish a routine cleaning interval for chemicals that readily precipitate or crystallize.
2. Check Process Pressure
Chemical cannot enter when process pressure exceeds the dosing pump’s discharge capability. Compare actual line pressure with the pump curve and pressure rating. See the available LMI dosing pumps for applications requiring accurate chemical metering.
3. Check for Blockage
Inspect the discharge tubing, connector, check valve, and injection quill. Even a partial blockage can stop flow and create unsafe pressure.
Dosing Pump Is Noisy or Vibrates
Abnormal noise or vibration may result from weak mounting, trapped air, excessive pressure, piping strain, or internal wear.
- Mount the pump on a rigid, level surface.
- Tighten the mounting hardware.
- Ensure tubing does not pull on the pump connections.
- Remove air from the pump head.
- Check discharge pressure and the pulsation dampener, if fitted.
- Determine whether the sound comes from the motor, solenoid, gearbox, or liquid end.
Stop the pump for further inspection if noise increases or the unit becomes unusually hot.
Why a Dosing Pump Repeatedly Loses Prime
Repeated loss of prime normally indicates air entering the suction side. Common causes include:
- An empty chemical tank.
- A leaking foot valve.
- Cracked suction tubing.
- Loose suction fittings.
- High-viscosity or off-gassing chemical.
- An unsuitable liquid end.
- Excessive distance or lift between the tank and pump.
Keep suction tubing short and airtight, and verify that the foot valve works correctly. High-viscosity and off-gassing chemicals may require a special pump head or installation arrangement.
Dosing Pump Troubleshooting Checklist
| Symptom | Possible cause | Corrective action |
|---|---|---|
| Pump runs but no chemical flows | Air leak, dirty foot valve, leaking suction tube | Prime, clean the valve, inspect tubing |
| Unstable flow | Dirty check valve, trapped air, changing pressure | Clean valves, bleed the head, check back pressure |
| Chemical leak | Damaged diaphragm, loose fitting, worn O-ring | Replace damaged parts and correct fittings |
| No injection into process | Blocked injection valve, high line pressure | Clean the valve and verify pressure rating |
| Noise or vibration | Weak mounting, air, excessive pressure | Secure mounting, prime, check pressure |
| Inaccurate dose | Incorrect setting, worn valve, unstable pressure | Recalibrate and inspect valves |
Calibration and operating-release record
After a fault is corrected, do not return the dosing pump to normal service only because chemical is flowing again. Measure actual output with drawdown or a calibration column, then connect that number to chemical concentration and the process target.
| Release data | How to record it | Decision limit |
|---|---|---|
| Pump setting | Stroke, speed, control mode, and 4-20 mA signal where used | Must match the tested value, not only the panel value |
| Drawdown flow | Volume drop divided by time at actual process pressure | Repeat calibration if trial results are unstable |
| Discharge pressure | Gauge reading while injecting into the live line | Hold operation if pressure approaches/exceeds pump or tubing rating |
| Chemical concentration | Chemical name, solution concentration, batch, and mixing date | Recalculate dose when concentration changes |
| Process evidence | Chlorine residual, pH, ORP, antiscalant setpoint, or another application parameter | Release operation only when the process parameter returns to target range |
For new systems or retrofits, match the troubleshooting result to LMI/Milton Roy dosing pumps, OBL dosing pumps, dosing and injection accessories, and suitable monitoring instruments. In drinking-water or foodservice duty, dosing results still need commissioning, sanitation, consumables logs, and representative sampling.
| Accessory to check | Role in operating release | Minimum evidence |
|---|---|---|
| Calibration column | Measures actual output instead of inferring it from the panel setting | Volume, time, pressure, and L/h result |
| Back-pressure or anti-siphon valve | Stabilises metering and prevents siphoning | Line pressure and flow direction when the pump stops |
| Pressure relief path | Protects tubing and the pump head during a blockage | Set pressure, return route, and valve condition |
| Injection quill/valve | Confirms chemical enters the correct process point | Injection-point photo, check-valve condition, and no-blockage evidence |
Maintenance Tips for Longer Pump Life
- Clean the foot valve and injection valve regularly.
- Inspect suction and discharge tubing.
- Calibrate actual flow at defined intervals.
- Prevent chemical from settling in the tank.
- Use materials compatible with the chemical.
- Do not run the pump with an empty tank.
- Inspect diaphragms, seals, and valves on schedule.
- Use a strainer when contamination is possible.
- Maintain the required back pressure.
- Record settings, calibration results, and spare-part history.
For related process information, read getting to know chemicals in water treatment and their uses. Product options include the dosing pump range, Hydropro products, and LMI dosing pumps.
When Should a Dosing Pump Be Replaced?
Consider replacement when output remains unstable after calibration, diaphragms and valves fail repeatedly, the pump head is cracked, the pump cannot meet process pressure, spare parts are unavailable, capacity no longer matches the process, or repeated repairs are uneconomical.
For industrial service, replacing an unreliable pump can cost less than recurring downtime. Correct selection of capacity, pressure rating, wetted materials, and control method helps prevent premature replacement.
Conclusion
Dosing pump troubleshooting should follow the chemical path: tank, suction tubing, foot valve, pump head, check valves, discharge tubing, injection valve, and process pressure. The most common causes are trapped air, blocked valves, leaking tubing, incorrect settings, unstable back pressure, and incompatible materials.
A systematic inspection helps operators correct faults before they cause larger failures. Water.co.id provides a complete dosing pump range, Hydropro products, and LMI dosing pumps for water-treatment and industrial chemical-dosing applications.
Dosing Pump Troubleshooting FAQ
Why does the pump run without discharging chemical?
The most likely causes are air in the suction line, a dirty foot valve, an empty tank, or a blocked check valve. Prime the pump and inspect the suction path first.
Why is dosing flow unstable?
Common causes are air in the pump head, worn check valves, changing discharge pressure, or an incorrect stroke setting. Clean the valves, stabilize pressure, and recalibrate.
How should a leaking dosing pump be handled?
Stop and isolate the pump, wear appropriate PPE, relieve pressure, and inspect the fittings, tubing, O-rings, diaphragm, and pump head. Replace damaged parts with chemically compatible components.
Why does chemical fail to enter the process pipe?
The injection valve may be blocked, process pressure may be too high, or the discharge tubing may be obstructed. Clean the injection assembly and verify the pump pressure rating.
How often should a dosing pump be calibrated?
Set the interval according to process criticality and the manufacturer’s recommendation. Recalibrate after changing chemical or spare parts, changing settings, or observing an incorrect dose.
Technical sources
- Milton Roy, Series G Model B metering pump instruction manual, troubleshooting section, accessed 1 August 2026.
- Milton Roy, Metering Pump Principles, check-valve operation and the setting-to-flow relationship, accessed 1 August 2026.
- Milton Roy, Calibration Columns, flow verification after maintenance or troubleshooting, accessed 1 August 2026.
Footnotes
-
Milton Roy, Series G Model B metering pump instruction manual, troubleshooting section. The manual for the installed pump model remains controlling in the field. ↩

.png)